I decided to share my resources here, partly to share the general approach and partly as a纪念. The project was the 2020 Electric Contest Problem F: Simple Non-Contact Temperature Measurement and Identity Recognition Device
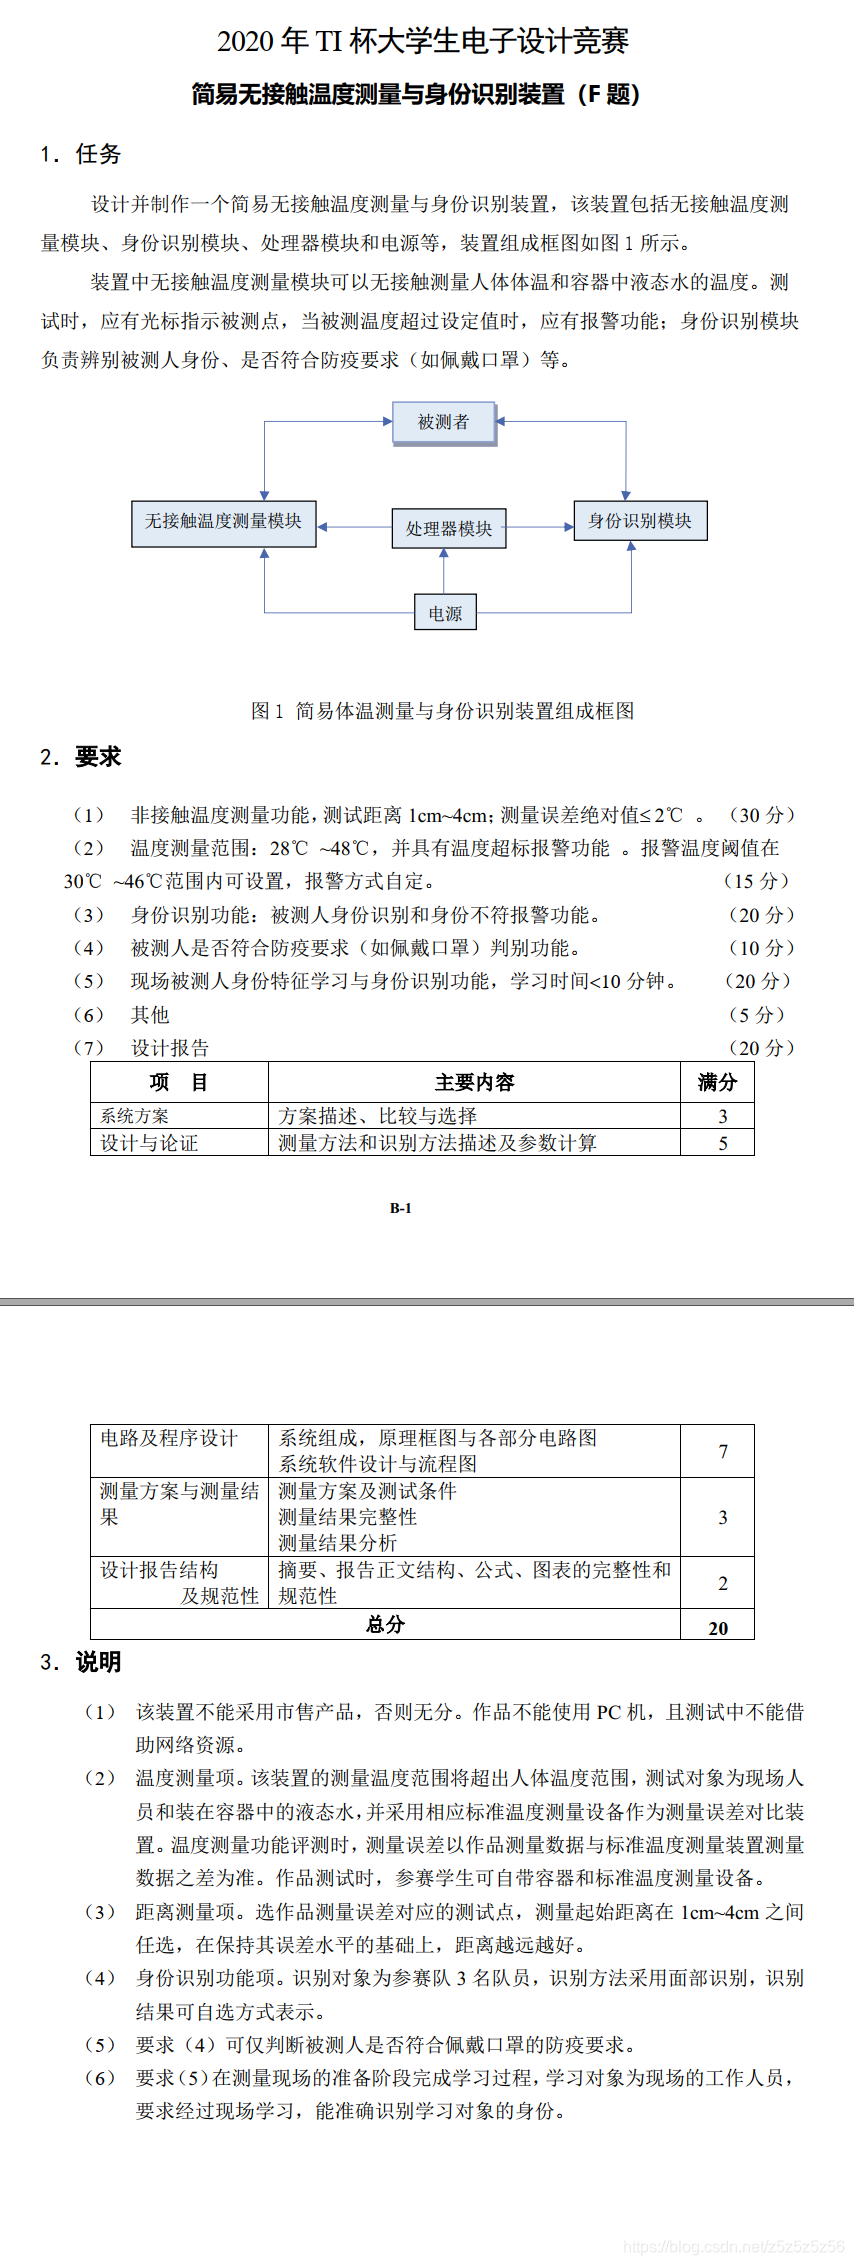
2020 Electric Contest Problem F
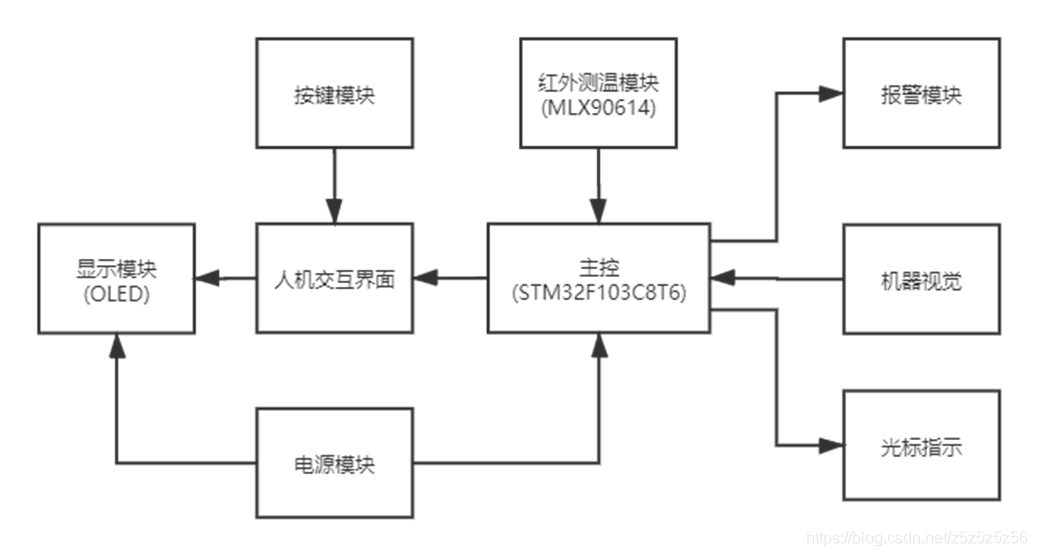
Overall Design
Hardware Selection
We used OpenMV for machine vision. We had been preparing with OpenMV during our competition preparation, and we thought OpenMV's capabilities were sufficient. At that time, we were about to order K210 to start learning, but by the time it arrived, it was already the third day, and there wasn't enough time for debugging - too risky. So we decided to use OpenMV.
OpenMV H7 Plus
Fortunately, we bought the top-tier model OpenMV H7 Plus, and we successfully completed all the tasks required by the problem.
For temperature measurement, we used MLX90614 with a module from Taobao to read temperature via I2C. In the end, we didn't get the first prize - we got the second prize, and it was because of this module. It failed at the testing site. A bloody lesson: always have a Plan B!
We used STM32C8T6 as the main controller because we were already familiar with it during competition preparation. Other controllers would also work.
Other hardware included OLED for displaying temperature thresholds, buttons, active buzzers, laser pointers, etc.
The final PCB layout is as follows:
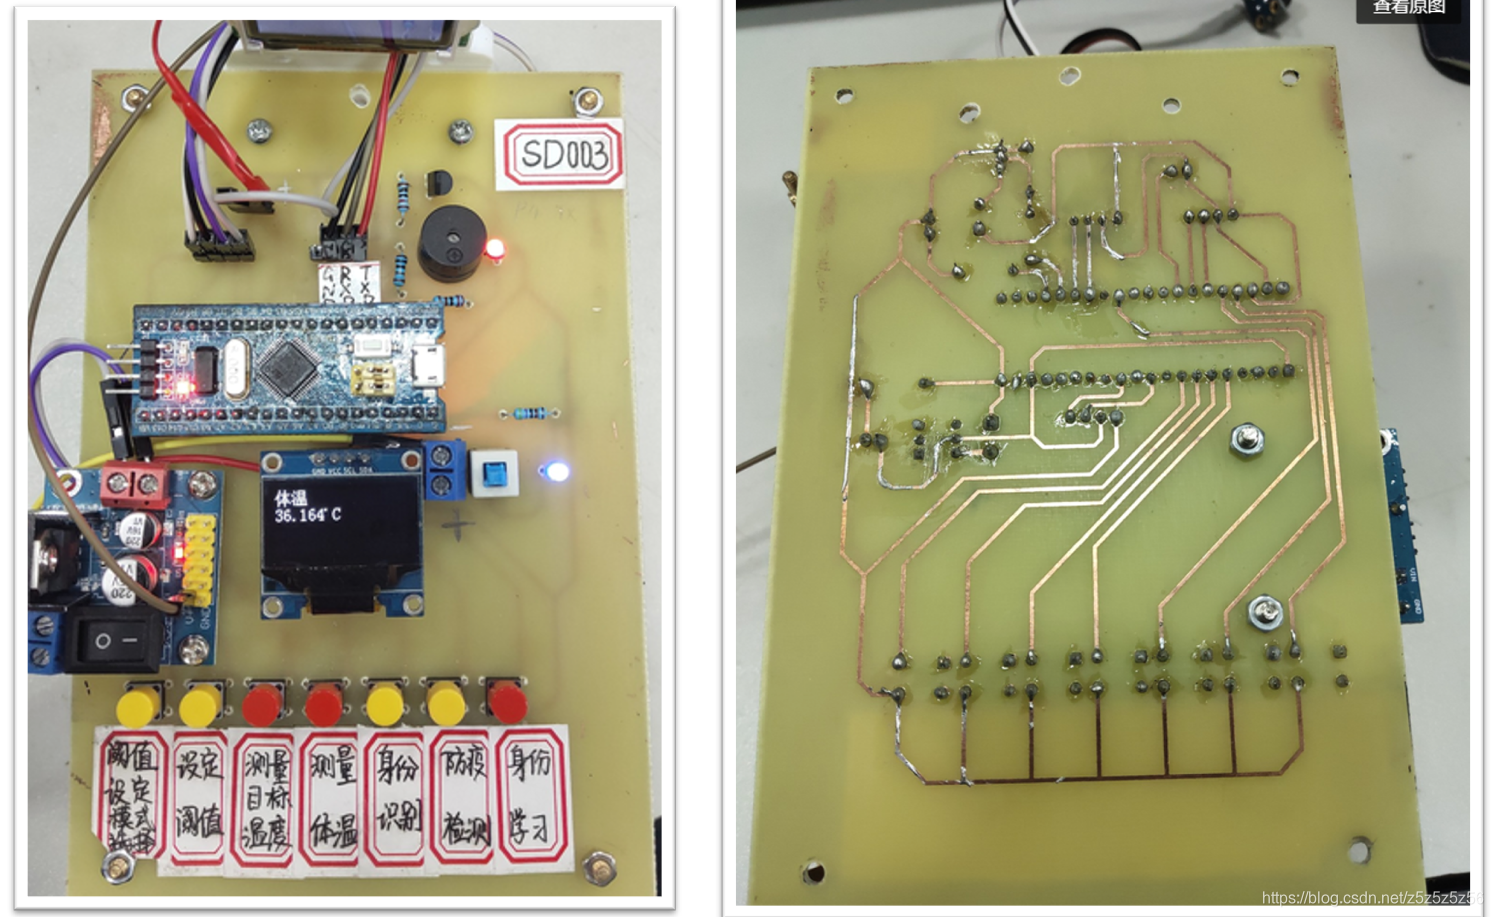
PCB Layout
Software Flow
STM32 and OpenMV communicate via serial port. We defined a letter corresponding to each mode. After powering on, OpenMV continuously waits for letters in a loop. When a letter is received, it executes the corresponding mode function and returns the result. See the software flow chart for details:
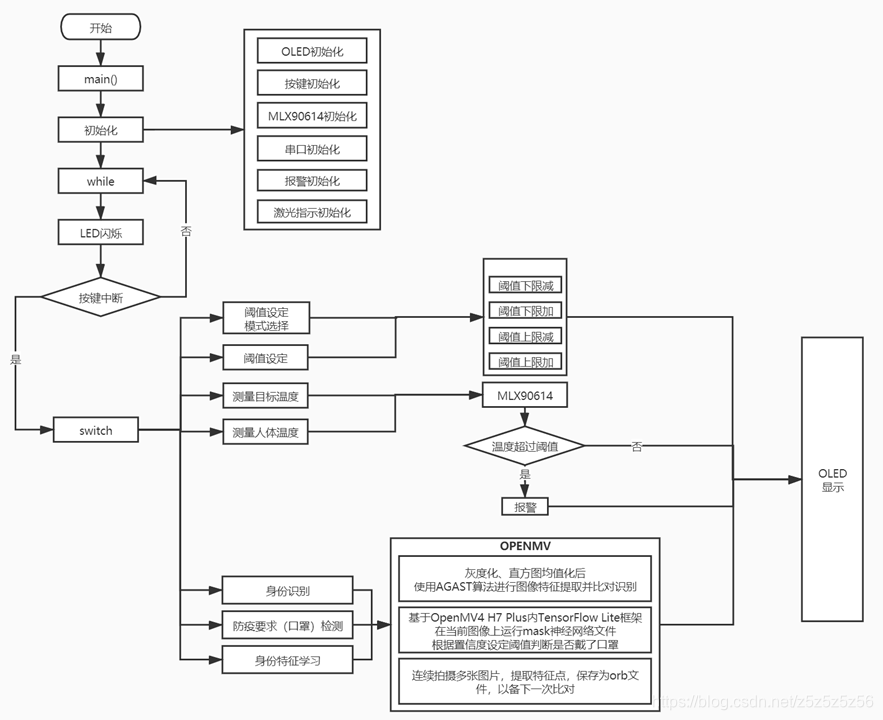
Software Flow Chart
Vision Algorithm
Since I was mainly responsible for the OpenMV vision part of the code, I'll talk more about the Python code writing experience here.
The main reference materials at the beginning were from SingTown's two function library links:
Distinguishing Different Faces (Identity Recognition)
My first reaction to the problem was the LBP application for distinguishing different faces that I had seen in the Chinese tutorial. So on the first day, I tested it according to the manual, but the actual effect wasn't good. It was greatly affected by light and background, and the face had to fill the entire camera - very inconvenient.
Later, I discovered the feature point algorithm, which greatly improved computation time. But there was still a problem: if the background captured was too large, many useless feature points would be extracted from the background. It was too stupid to require the person to maintain a certain distance and fill the screen with their face.
My approach: First add a layer of face recognition, extract and enlarge the face region locally, then extract feature points from that and perform feature point comparison. Using this method, the person being recognized doesn't need to meet many requirements, achieving similar functionality to K210~
Here's the code for this approach:
#Draw feature points
def draw_keypoints(img, kpts):
    if kpts:
        print(kpts)
        img.draw_keypoints(kpts)
        img = sensor.snapshot()
        time.sleep(1000)


def find_max(pmax, a, s):
    global face_num
    if a>pmax:
        pmax=a
        face_num=s
    return pmax

def Distinguish_faces():
    global NUM_SUBJECTS
    global NUM_SUBJECTS_IMGS

    pyb.LED(3).on()
    #Reset sensor
    sensor.reset()
    sensor.set_contrast(3)
    sensor.set_gainceiling(16)
    sensor.set_framesize(sensor.VGA)
    sensor.set_windowing((240, 240))
    sensor.set_pixformat(sensor.GRAYSCALE)

    sensor.set_auto_gain(True, gain_db_ceiling = 20.0)
    sensor.skip_frames(time = 500)

    pmax=0#Save matching degree between detected points and sample points

    loop_flag=1#Loop detection flag
    type_flag=0#kpts1 class correct flag
    while(loop_flag):

        #Add histeq for adaptive histogram equalization
        faces = sensor.snapshot().gamma_corr(contrast=1.5).find_features(image.HaarCascade("frontalface"))
        lcd.display(sensor.snapshot())

        if faces:
            #Get largest face ROI
            largest_face = max(faces, key = lambda f: f[3] * f[3])
            img=sensor.get_fb().crop(roi=largest_face)#Crop face

            kpts1=img.find_keypoints(max_keypoints=90, threshold=0, scale_factor=1.3)

            if(type(kpts1).__name__=='kp_desc'):
                type_flag=1
            else:
                print("kpts1 type wrong")
                type_flag=0
        else:
            print("find no face")

        if type_flag:
            loop_flag=0

            lcd.display(img)
            draw_keypoints(img, kpts1)
            num=0
            #Feature point comparison
            kpts2=None
            feature_values=[0]
            for s in range(1, NUM_SUBJECTS+1):
                match_count = int(0)
                angle_count=0

                for i in range(2, NUM_SUBJECTS_IMGS+1):
                    kpts2=image.load_descriptor("/keypoints/s%s/%s.orb"%(s,i))
                    match_count+=image.match_descriptor(kpts1, kpts2).count()

                print("Average match_count for subject %d: %d"%(s, match_count))
                pmax = find_max(pmax, match_count, s)
                feature_values.append(match_count)

            #Calculate average
            feature_sum=0
            for feature_value in feature_values:
                print("feature_value is %d" % feature_value)
                n=len(feature_values)-1
                feature_sum+=feature_value
            average=feature_sum/n
            print("average is %d" % average)

            #Calculate variance
            pow_sum=0
            for feature_value in feature_values:
                if feature_value==0:
                    feature_value=average
                print("variance:%d" % math.pow(feature_value-average,2))
                pow_sum+=math.pow(feature_value-average,2)

            variance=pow_sum/n
            print("variance is %d" % variance)

            #Judge by variance
            if variance<1500:
                uart.write(str(0))
                print("unknown person !")
            else:
                uart.write(str(face_num))
                print("The most similar person is:%d"%face_num)

    lcd.clear()
    pyb.LED(3).off()
There are many other small details in the code. For example, I added a variance calculation at the end to make stranger face recognition more accurate. If the feature point comparison results with the three stored people are all similar (small variance), it's likely not one of the three people but a stranger. This variance threshold was determined through practice and may need adjustment based on lighting.
Summary (crash version, for systematic theory study please refer to other experts):
- LBP (Local Binary Patterns): Collect a certain number of template pgm images. During face recognition, compare the read image with the template database and select the highest similarity to determine the tested person's information.
- Feature Point AGAST Algorithm: Multi-scale fast corner feature extraction algorithm. Save target feature orb files in advance. During face recognition, extract target's feature points and match with the feature point library to get the result. After variance calculation to judge credibility, get the final result.
Mask Detection
Two models lead to two different methods:
- Method 1: Use Haar operators, convert XML files to cascade format, then recognize. The downside is that a mask model trained with few samples has low accuracy during recognition.
- Method 2: Use the built-in TFLite neural network framework. Now the OpenMV manual has a TFLite mask detection model, and recognition results have greatly improved.
On-site Learning
Using feature points, on-site learning is just taking photos, extracting feature points, and saving files on-site. In my logic, on-site learning didn't add much difficulty. We took 20 photos on-site which was enough.
#Feature learning
def machine_learning():
    sensor.reset()
    sensor.set_contrast(3)
    sensor.set_gainceiling(16)
    sensor.set_framesize(sensor.VGA)
    sensor.set_windowing((240, 240))
    sensor.set_pixformat(sensor.GRAYSCALE)

    sensor.set_auto_gain(True, gain_db_ceiling = 20.0)
    sensor.skip_frames(time = 2000)

    global NUM_SUBJECTS_IMGS
    global NUM_SUBJECTS
    print("last NUM_SUBJECTS =%d" % NUM_SUBJECTS)
    NUM_SUBJECTS=NUM_SUBJECTS+1
    print("now NUM_SUBJECTS =%d" % NUM_SUBJECTS)

    p_num=NUM_SUBJECTS_IMGS
    s=NUM_SUBJECTS
    kpts1 = None

    while(p_num):
        pyb.LED(1).on()
        faces = sensor.snapshot().gamma_corr(contrast=1.5).find_features(image.HaarCascade("frontalface"))
        lcd.display(sensor.snapshot())
        lcd.clear()
        if faces:
            largest_face = max(faces, key = lambda f: f[3] * f[3])
            img=sensor.get_fb().crop(roi=largest_face)

            lcd.display(img)
            kpts1 = img.find_keypoints(max_keypoints=90, threshold=0, scale_factor=1.3)
            if (kpts1 == None):
                print("Couldn't find any keypoints!")
            else:
                draw_keypoints(img, kpts1)
                lcd.display(img)
                image.save_descriptor(kpts1, "keypoints/s%s/%s.orb"%(s,p_num))
                img.save("keypoints/s%s/%s.pgm"%(s,p_num))
                p_num-=1
                print(p_num)
                pyb.LED(1).off()
                pyb.LED(3).on()
                sensor.skip_frames(time = 50)
                pyb.LED(3).off()
                uart.write(str(9))
        else:
            print("find no face")

    pyb.LED(2).on()
    sensor.skip_frames(time = 100)
    pyb.LED(2).off()
    sensor.skip_frames(time = 100)
    pyb.LED(2).on()
    sensor.skip_frames(time = 100)
    pyb.LED(2).off()
    lcd.clear()
    uart.write(str("f"))
Other Optimization Algorithms
We really worked hard to get good results from OpenMV!
- Histogram Equalization:
.histeq(adaptive=True, clip_limit=3)After histogram equalization, the grayscale histogram almost covers the entire grayscale range. Except for individual grayscale values that are more prominent, the overall grayscale distribution is approximately uniform. Processed images will have larger grayscale dynamic range and higher contrast, making details richer. - Local Enlargement Recognition:
sensor.get_fb().crop(roi=largest_face)First use the built-in face Haar model for face detection, then crop the face region for feature point comparison. This improves accuracy and reduces computation. - Auto Gain:
sensor.snapshot().gamma_corr(contrast=1.5)Gamma correction is used to correct color and contrast in images. Higher values make the image brighter.
In general, those two days I went through the Micropython function library, trying everything one by one. These functions were the ones that actually helped improve the results.
Conclusion
We finally got the second prize in Fujian Province. Because the 90614 module had problems during testing, the temperature measurement failed. However, other parts including the vision part got full marks. It's a pity we didn't get the first prize - consider it a lesson to always prepare a Plan B.
For the OpenMV part code, the main content has been posted above. For mask recognition, please refer to the official link. Everything essential has been written above. Capable students should be able to reproduce it.
Welcome to discuss in the comments. Feel free to share solutions and experiences. I do NOT provide hardware or software engineering code!!